|

Introduction
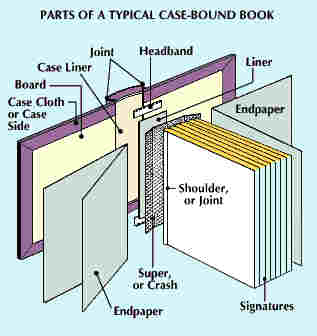
Parts of a Typical Case-Bound Book
The processes of binding a book by hand are much
the same as they were 500 years ago. Bookbinding began when the codex started to
replace the roll. The earliest elaborately decorated book bindings were those
produced for use on church altars. Those that survive are often magnificent
examples of the jeweller's, goldsmith's, ivory carver's, or embroiderer's arts.
The necessary equipment includes a sewing frame to
hold the folded sheets while the sections are being sewed to the cords or tapes
that run across the back. Also needed are two presses. The first holds the book
while the back is rounded by gentle hammer taps. The second holds it while the
covers are put on. In hand binding, unlike machine or case binding, the sewing
cords are fastened directly to the stiff board sides before the cloth or leather
covering is put on.
Contents
Back to Top
Decorated Covers
For decorating and lettering the cover of a book,
small brass stamps set in wooden handles are used. A wheel called a fillet makes
plain lines. Wider wheels, called rolls, with various patterns on the edges, are
used for producing and imprinting detailed ornamental bands or borders. In
gilding the edges of a book the first step is usually to spread a thick red
stain. After this is dry and carefully brushed, the binder applies a glair, made
of whites of eggs beaten up with water or vinegar. Then very thin gold leaf is
laid on. When the glair is quite dry and the gold has set, the edge is burnished
by rubbing with a smooth piece of stone or leather. Sometimes landscapes are
painted on the fore edge in such a way that they are only visible when the edges
are slightly fanned.
Although the processes of hand binding have
remained the same for centuries, there have been great changes in the materials
used and in the style of decoration. The earliest bindings, even for small
books, were usually made of oak boards. Sometimes the boards were covered with
leather or vellum; these are called full bound.
Sometimes the boards were left exposed, only enough
of the leather or vellum back being fastened to the edges to hold the sides;
these are called half bound. The ornamentation of the back and sides became a
special art, called finishing.
Back to Contents
Back to Top
Use of Paper and Cloth
As the production of books increased and the size
of the volumes decreased, bookbinders began to substitute paperboard for oak.
About the beginning of the 19th century glazed calico was first tried as a cover
for the paperboards, and about 1830 cotton cloth was introduced in England.
The use of cloth created new possibilities in
decorative binding. Cloth is more easily handled than leather or vellum and is
easily marked by stamps or dies. It permits binding large editions in identical
designs at low cost. In the United States and Great Britain, the boards of most
new books are covered with cloth, paper, or a combination of the two. In
continental Europe many books are issued in flexible paper covers. Permanent
bindings are put on later.
As early as the 4th century many manuscript volumes
were elaborately bound. Most of these, however, were later destroyed for the
gold, silver, gems, or carved ivory with which they were ornamented.
At first the printing and binding of books centred
in monasteries and church schools. Then it was transferred to universities and
later to commercial establishments. By the end of the 15th century a few
bindings were stamped with the names or devices of printers or binders. Some
early printers, notably Anton Koberger at Nuremberg, Germany, developed styles
of binding still associated with their names. Most binding styles are named
either after a binder or after a famous collector or patron.
Back to Contents
Back to Top
Gilded Decoration
A great variety of decoration was made possible by
the introduction of gilding, about the last quarter of the 15th century. In
Germany blind stamping (that is, without gilding) remained the fashion even into
the 1700s. In Italy, in France, and in some English binderies, leather stamped
in gilt became the material for fine bindings. In France, through nearly three
centuries, the art of binding received magnificent support from kings, queens,
nobles, and clergy. Their favourite books have since become the pride of
museums, libraries, and private collectors. Jean Grolier was one of the greatest
book collectors of the 1500s. Most of his books were bound in leather covered
with geometric patterns inlaid with contrasting bits of leather or coloured
enamels. Maioli bindings, made for Thomas Mahieu, secretary to Catherine de'
Medici, and the English bindings made for Sir Thomas Wotton are similar to the
Grolier books. The royal binders Nicolas and Clovis Eve, the unknown binder
known as Le Gascon, and later Antoine Michel Padeloup and Nicolas-Denis Derome
each developed definite styles of decoration. In mechanical finish the work of
these early binders is often inferior to that of the best workmanship of today.
In design it has not been surpassed.
In England in the 1600s, Samuel and Charles Mearne
developed the "cottage" style of decoration. This took its name from a
roof like pattern used in almost every binding. After the Mearnes there was no
important English binder until Roger Payne, one of the truly great binders.
Payne combined small patterns with pleasing blank spaces. Payne's designs were
more or less followed in the 1800s by Charles Lewis, Charles Kalthoeber, Francis
Bedford, and later on a greater commercial scale by the firms of Robert Riviere
and Joseph Zaehnsdorf. John Edwards of Halifax developed an original style,
usually called Etruscan from the patterns he used. Edwards made a specialty of a
transparent vellum. The underside of the vellum was decorated with landscapes or
allegorical painting. He excelled in fore-edge painting. His work is now highly
prized.
Back to Contents
Back to Top
Modern Designs
Design in bookbinding received a new inspiration
toward the end of the 1800s. This came at the same time as the artistic revival
in printing for which William Morris was responsible. Morris' friend Thomas J.
Cobden-Sanderson designed bindings which combined geometric figures with
conventional patterns. Cobden-Sanderson was one of the few hand binders who
himself did the finishing and all the sewing and forwarding. Cobden-Sanderson's
influence was great, through his own work and through his pupils. Among them
were Douglas Cockerell and Sarah T. Prideaux. In the United States most of the
outstanding binders, such as William Matthews and Alfred de Sauty, were men who
were born and trained abroad. They brought to this country the best European
traditions and standards of workmanship.
With the turn of the 20th century the note of
modernism appeared in binding design as in other forms of decorative art. Design
in binding follows the general trend of other arts. Modernism in binding is
comparable to the same trend in furniture or in architecture. Bookbinding is one
of the fine arts. Like all arts it reflects the spirit of its time.
Back to Contents
Back to Top
Book Manufacturing Today
The process begins with the decision of a publisher
to issue a book. After the manuscript of the book has been prepared, a book
designer, in consultation with editors and printers, develops specifications for
the book--its size and shape, the typefaces in which it is to be set, and the
treatment of tables and illustrations. The printer and the binder then prepare a
dummy, or mock-up, of the book, showing the paper to be used, the thickness and
binding of the volume, and--ordinarily--some specimen printed pages.
Back to Contents
Back to Top
Typesetting and Printing
After a book manuscript is edited, the next step is
to set it in type. Most books are typeset using phototypesetting machines. The
earliest models of these machines worked by taking a separate picture of each
letter in its proper place. Newer models use computer devices to store the
proper shape of each character as digital information.
This information is used to operate a cathode-ray tube (CRT), or a laser, which
forms the characters as needed. These more advanced
phototypesetters are also known as digital typesetters.
Phototypesetting machines use computer technology
to make typesetting much faster and simpler than the older hot metal techniques
of Linotype and Monotype machines. Before
actually setting the type, the phototypesetter rearranges the lines
electronically in order to produce justified copy (copy that is even at both
margins). When a word must be split, the machine indicates this to the operator,
who must tell the machine where to split the word. Larger, more modern
typesetting machines are capable of storing entire dictionaries in their
memories. This permits the machine to automatically split words at the proper
places and to check for spelling errors.
There are four kinds of phototypesetters:
photo/optic, photo/scan, digital/CRT/scan, and laser/scan. The first two employ
film grids that contain pictures of all the characters of a type font. In the
photo/optic typesetters, the film grid is positioned so that a light beam passes
through the correct character and is reflected onto photosensitive paper or
film. Lenses and mirrors can enlarge or reduce the size of the letter.
In the faster photo/scan typesetters, the film grid
is scanned electronically to form an image on a small CRT, which produces the
image that is reflected onto the paper or film. Since the characters are
generated electronically, they can be modified easily to make them slanted,
condensed, or heavier, as well as larger or smaller.
Digital/CRT/scan typesetters and laser/scan
typesetters do not use film grids. Instead, the typefaces are stored digitally
in a computer memory. In the digital/CRT/scan typesetters, the digital
information is used to generate a picture on a CRT of each character as it is
needed. This picture is then used much as in the photo/scan typesetters. The
laser/scan typesetter uses the digital information to control a laser, which
scans the photosensitive paper or film directly, exposing only those parts of
the paper necessary to form the words on the page. Grid-type phototypesetting
machines can set up to 50 lines per minute, while digital typesetting machines
can set up to 3,000 lines.
Although copy is usually typed into a
phototypesetter much as it would be typed on a typewriter, modern computers and
word processors also can be used to transfer already recorded information
directly for typesetting. This permits greater efficiency because the text need
be typed only once. Optical character readers (OCR's) have been developed that
can read text typewritten on ordinary paper. They store this information in
memory or transmit it to word processors or to phototypesetters.
Once the book's text has been typeset, it must be
proofread for errors. Most of the modern typesetting machines permit easy
editing and corrections of the text on video-display screens. Some machines can
display the text in precisely the form in which it will appear on the final
printed page.
After the text has been corrected, the type and any
illustrations are arranged in page format. These pages are photographed to make
the printing plates. Some phototypesetters can arrange the text into pages
automatically, allowing editors to review them on a screen before the type is
actually set. Other phototypesetters can also make the printing plates directly
from the information stored in memory.
Electronic engravers are often used in making the
printing plates for illustrations. Colour illustrations pose an added problem.
Since they are usually printed as four separate colours, one atop the other,
four separate printing plates must be made. This process has been much
simplified by the development of electronic colour scanners that can separate
the colours and make the plates in one operation.
Most books are now printed by a process known as
photolithography, more commonly called offset printing. Many books are still
printed by the older letterpress process or the gravure process. Sheet fed
presses, which print one sheet of paper at a time, have been largely replaced by
web presses, which use rolls of paper. The web-press operation permits faster
production by combining printing and folding into a single, continuous
operation.
Although the pages follow one another in numerical
order in a completed book, they are not printed that way. Each printing plate
contains a number of pages, so positioned that they will fall in proper order
when the unit of pages, or signature, is folded. Signatures may contain any
multiple of four pages; common signature sizes are 16, 32, or 64 pages. Most
presses print both sides of the paper at once and deliver folded signatures,
ready for the bindery.
Back to Contents
Back to Top
Elements of Modern Bookbinding
Essentially, the steps in edition binding--or case
binding, as the mechanized process is called--are the same as those in hand
binding. The signatures of the book are put in proper order, fastened together,
and enclosed in a protective cover. In assembling the book, those operations
which take place before the signatures, or body of the book, are joined into a
unit are called sheetwork; those which take place afterward are called
forwarding.
Steps in sheet work include folding the signatures
if they were not folded on the press, arranging them in order, and fastening
them together. Signatures are put in order on a gathering machine, or gathering
line. Piles of successive signatures are arranged in order in bins beside a
conveyor belt. A mechanical arm takes a first signature from its pile and places
it on the belt. The belt carries the signature to the next position, where
another arm places a second signature on top of it. The process continues until,
at the end of the line, a complete set of all the signatures in the book has
been assembled in the correct order.
Next the signatures are fastened together. Three
processes are in common use. Probably a majority of all books, and certainly
most general, or trade, books, are flexible sewn. The process is also called
Smyth sewing, after David McConnell Smyth, inventor of the first flexible-sewing
machine.
In flexible sewing, each signature is sewn through
its binding fold (the fold at the back, or spine, of the book) and to the
adjacent signatures. Flexible-sewn books open easily and the pages lie flat.
After the signatures are sewn together, the endpapers, which help hold the book
in its cover, are tipped to the first and last signatures with thin lines of
glue applied near the binding fold.
The book then passes to the nipper-gluer, in which
the backbone is compressed to reduce the bulk created by the sewing thread and a
coat of glue is applied to the spine to further bind the signatures together.
Some books require overall smashing, instead of just backbone nipping, to reduce
excess bulk.
Now a unit, the signatures are trimmed to final
size by heavy knives. Then, in the rounder-backer, the backbone of the book is
rounded to help the book hold its shape, and the joint, or shoulder, in which
the cover boards will hinge is formed. If desired, gilding--usually of
artificial gold--or stain is applied to the top of the book.
Then the super, or crash, is applied to the spine
of the book. This strip of open-mesh fabric, easily penetrated by glue, extends
beyond the edges of the backbone. Later it is glued to the cover boards beneath
the endpapers, helping to hold the book within its covers. A paper liner is
applied over the super, and decorative headbands are glued to the spine. The
book is ready for its cover.
Book covers, or cases, are prepared on case making
machines in which the boards and case liner are glued to the covering cloth
(case cloth, or case side). Decoration--the book's title, author, and publisher,
together with any desired illustration--may be applied to the case side either
by printing, before the case is assembled, or by stamping--usually in artificial
gold foil--after assembly.
The book and its cover are brought together at the
casing-in machine. Here glue is applied to the endpapers, and the super and
endpapers are glued to the boards and sealed under heat and pressure. Other
machines wrap the book's dust jacket around it and, if desired, put the book
into an individual carton and address it for mailing.
The development of fast-drying inks and
fast-setting glues, largely since the 1950s, has brought to edition binding a
speed and efficiency undreamed of in earlier years. Formerly, long waiting
periods between binding steps were necessary to permit adhesives to cure. Today,
a book may proceed from a stack of loose signatures to a fully bound volume,
wrapped and addressed to its buyer, in a matter of minutes. For long-run
books--volumes of which many thousands are printed--highly automated production
lines may be built. In these, books are mechanically bound with little or no
human attention.
Back to Contents
Back to Top
Side-Sewing and Adhesive Binding
Although there are several means of reinforcing a
flexible-sewn book so that it can withstand harder than ordinary usage, most
books intended for heavy use--such as textbooks and encyclopaedias--are fastened
by the process of side-sewing or side stitching or both. (In bindery terms,
"sew" indicates the use of thread; "stitch," the use of
wire.) In side-sewing and side stitching the gathered signatures are simply sewn
straight through, from one side of the book to the other, near the binding fold.
When a book is side-sewn, the endpapers are tipped to narrow strips of drill
cloth. These strips are sewn together with the signatures. A side sewn book
ordinarily has no super, since the function of the super is performed by the
drill strips.
Adhesive binding, which is becoming more and more
common, was made possible by the development of fast-setting glues which retain
flexibility even when dry. In this process the gathered signatures are pressed
together between jaws and the binding folds are cut off, exposing an edge of
each leaf. The edge is roughened, and a coating of glue is applied to hold the
leaves together. If an adhesive-bound book is to be cased in, endpapers are
tipped to its spine and a super is applied. If it is to be soft bound, or
paperback, the same glue that holds the leaves together attaches the paper cover
to the spine, and the book is completed by trimming pages and cover at once.
After sewing or gluing the remaining steps in casing-in side-sewn or
adhesive-bound books parallel those required in casing-in flexible-sewn books.
Back to Contents
Back to Top
|